Having won over Queen Helgar with a show of wealth and generosity (unheard of in a dwarf!) Drong had succeeded in securing the Queen's hand in marriage and all seemed well. The Dwarfs were happy, new trade routes were opened and the Elves breathed a sigh of relief. Drong lifted the taxes on goods travelling through drudge pass and all started to prosper again. Elsewhere however storm clouds grew. As tensions between elves and dwarves throughout the old world heightened and clashes became more frequent.
A Rune Smith by the name of Grung arrived in Krag Bryn. He claimed to have been driven from his ancestral lands by the Elves and he bore a deep seated drudge. He attended Drong's hall and as the evening progressed his stories became increasingly spiteful toward the Elves whilst extolling the dwarven virtues of pride and valour. He then cried out to all of the dwarfs present "Is it fitting for a Dwarf such as DRONG the hard to Elves rich?" Drong was shamed and his pride was hurt. He began plotting with the Runesmith to launch a grudge war against the Elves of Tor Eldroth.
Queen Helgar was not impressed with this. she was snubbed by the Runesmith who failed to show her the correct respect due to her noble lineage. She secretly despatched messages to her Elven allies warning them of the treacherous Runesmith.
And so it was that the Elves ambushed Grung whilst he and his followers were traversing the narrow and treacherous High Road through the mountains.
And so the Scene is set for Scenario 2 'The Ambush'.
Again we tweaked the armies slightly by setting a points limit of 1000pts for The Old World but otherwise we stuck fairly closely to the historical armies and we followed the limits imposed by the Battle Scrolls.
 |
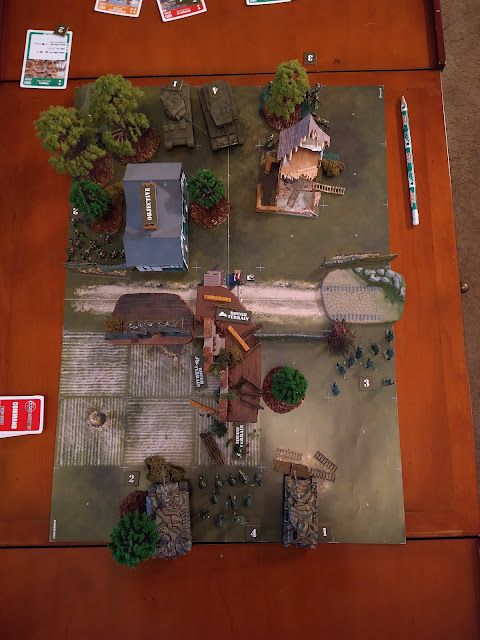
| Initial set up. The Dwarfs can set up no more than 12" from their table edge and no closer than 12" to either short edge. Their long table edge is 'The Chasm of Doom" and is signified by a line of stones here. The Road is 12" from the Chasm and runs the entire length of the battlefield. areas of stones indicate areas of difficult terrain. Drong must be 24" from the short table edges. |
 |
| Sword Masters, Spearmen, the Mage Tethan and two great Eagles formed the main Elf battle line opposite Drong and his BSB with a unit of Quarellers. (The dwarfs have to deploy in marching column no more than 3 wide) |
 |
| The rear of the dwarf column is made up of a unit of Slayers. Behind them were the shadow warriors and near the trees was the final Great Eagle. |
As Grung's column reached the mid point in the pass the Elves sprung their ambush. With a great cry the Two Eagles with Tethan sped across the battlefield and crashed into the flank of the Dwarf Quarrellers. (This was my first mistake! I completely forgot about the whole Fighting rank rule! 🤦)
The rest of the Elven army advanced toward the Dwarves while the third Eagle swiftly soared behind the Slayers.
The Shadow Warriors took aim at the Slayers in front of them and loosed a volley of arrows which struck down 5 of the naked loonies!
As the Eagles struck the Dwarf column Grung and his BSB barrelled their way to the flank to face the opponents. The Eagles fair poorly against the dwarfs struggling to penetrate their armour. Gwailin launches all of her attacks against the Dwarven thane carrying the Battle standard and engulfs him in her razor sharp beak. as she bites down however the dwarfs armour holds and she can't penetrate it. Before she can react the dwarf brings up his hammer and smashes her in the face killing the noble bird. Similarly Grung quickly despatches Eryr in a flurry of blows. The noble Eagle did manage to bite off the head of one of Grungs escorts before he died however.
With a triumphant shout the dwarves surged forwards (now here we were a bit stuck. the rules as written said that the dwarves had to overrun "directly forwards, without pivoting" so that meant the dwarves ran 3" along the road rather than toward the Elven lines 🤷)
The victorious Quarrellers then reformed their formation going from marching column into firing line. (again we got the rules wrong here as the movement rules state "Regardless of the manoeuvre performed, no model can move more than twice its Movement characteristic" and we missed this so the dwarfs were able to reform into a very long thin line) The slayers cautiously advanced toward the Elves main battle line.
Having reformed into their firing line the Quarrellers took aim at the Sword Masters and loose off a volley of over 30 bolts! luckily the complex manoeuvre had left the dwarves little time to take careful aim and only 2 sword masters were felled by their fail of bolts. Seeing the lack of success from shooting Grung called forth the powerful magics within the Fiery Ring of Thori (This is a special magic item created for the campaign. It's a bound spell that is automatically cast and creates a magically barrier of flame 6" in front of the dwarf unit that extends for the entire frontage of the unit. The flame lasts until the start of the dwarf players following turn. no model can cross the barrier or draw line of sight through it unless they are immune to fire. We used it exactly as described in the campaign pack even though it doesn't quite fit perfectly into the rules for bound spells in The Old World rules.)
 |
| End of turn 1 here you can see the long line of Dwarfs and the Nerf bullets indicate the fire wall. The Elven mage has moved out from the spearmen to try and get into range for his spells. |
 |
| The Shadow Warriors remain in the rocks firing at the Slayers whilst Bwncath the last remaining Great Eagle positions himself in the Slayers rear. |
With the raging wall of fire between them and Grung there is little the elves can do other than position themselves ready for when the wall dissipates. Bwncath charges the slayers rear whilst the Spearmen fail to charge the Slayers front. Bwncath tears apart one of the Slayers who in their shock at being taken in the rear fail to land any blows on the noble bird. the Slayers give ground but Bwncath follows up and keeps the pressure on the dwarfs.
As the fire wall fades the Quarrellers take aim at the Sword Masters and shower them with bolts killing 8! on the other side of the field Bwncath continues to take his revenge on the Slayers killing two more and forcing the dwarfs to once again give ground.
 |
| End of turn 2! the Sword Masters are woefully short of troops whilst the Spearmen have ended up in completely the wrong position (in hindsight I should have concentrated on killing the Slayers and ignored the crossbows once I lost the first two eagles. Instead the Elves end up attacking piecemeal) |
In a desperate attempt to take down the troublesome Runesmith the Sword Masters charge the Quarrellers who take steady aim and stand and shoot taking down 3 of the brave Elves. The Spearmen charge the Slayers and the Shadow Warriors continue to advance to get into range of the quarrellers.
The Spearmen take down 2 slayers and Bwncath takes down another 2 (Again we got the rules wrong as we played the 8th Ed rules for Elven spearmen allowing them to fight in 3 ranks) . The Dragon Slayer kills the Elven Sentinel and the last remaining slayer on the rear rank finally manages to land a blow on Bwncath. The Eagle then stomps on the dwarfs killing another Slayer. In the main event the Sword masters desperately try to take down Grung directing all of their attacks at the Runesmith. Unfortunately the loss of all of their comrades has obviously shaken these elite Elves as not a single blow lands a telling wound. Grung hard pressed to defend himself is also unable to cause any wounds. His loyal standard bearer however is able to take advantage of the Elves preoccupation cutting them all down as they focus on attacking Grung.
With the Sword Masters now dead the Quarrellers now turn their attention to the Shadow Warriors and unleash another withering volley. These Elves are much harder to spot than their white clad cousins however and the Quarrellers fail to bring any of them down. Bwncath brings down another slayer while the Spearmen kill 5! The Dragon Slayer takes down two Elves in return.
(I forgot to take a photo here 🤦)
The Shadow Warriors finally in range of the Quarrellers took aim and loosed a volley at the troublesome Dwarfs killing 4 of the stunty warriors. Bwncath takes down another Slayer but takes a wound in return. The Spearmen finally take down the Dragon Slayer but lose an Elf in the process.
The Quarrellers again reform (again we got this wrong 🤦) and fired on the Shadow Warriors but again missed everything. Bwncath and the Spearmen finally finished off the last slayer.
As the sun started to dip behind the mountains Bwncath flew off toward his Eyrie leaving his Elven allies to count the cost. The Shadow Warriors determined to the last, fired another volley into the Quarrellers felling another 3 dwarfs. The Spearmen started the long trek back to Tor Eldroth the heads low mourning their lost comrades.
 |
| The Final picture as the Elves withdraw the Dwarfs in a final act of Spite spin on their heels take aim at Bwncath and finally bring down that most noble and brave of Avians. |
And so Grung was free to return to Krag Bryn telling tales of Elven treachery in the mountains. This Dwarven victory means that they have free reign when building Runic items, had they lost the Dwarfs would have been limited to a max spend of 150pts on runes for the entire army in the final battle. It also means they can take Grung in the final battle should they choose.
Again this battle very closely followed the 'historic' battle with Grung and his Quarrellers surviving while the Slayers died. I do think that the dwarfs were aided in this by our misunderstanding the reform rules but even more so by my poor decision making.
With the benefit of hindsight charging Gwailin and Eryr into the flank of the Quarrellers was a poor choice. They would have been better deployed to the front and rear of the Quarrellers to prevent them from reforming whilst the Spearmen and Sword Masters should have marched directly at the Dwarfs to get within 6" and stop Grung from using his Fiery ring, this would have also prevented a stand and shoot reaction to a charge on turn 2. Bwncath did a great job holding up the Slayers and probably didn't need any help from the Spearmen. He could have been helped by the Shadow Warriors instead. Tethan was bloody useless in this battle and I do find that magic is far less useful in this edition of the game (or I'm struggling to work out how to use it.) Given his magic items I should have kept him in the Spearmen and then used him in H2H against the Quarrellers but by not engaging the Quarrellers in combat with the eagles in the first turn I could have also used him to cast Fiery Convocation on the Quarrellers which would have helped to reduce their numbers.
Overall it was another really enjoyable battle, although my spirits did dip a little when the Sword Masters were so decimated by dwarven crossbow fire. It's maintained my hobby boost and has given me the drive I need to finish painting more Elves.
The next battle will be the Brewery Bash so I need time to prepare all the necessary terrain as well as finish painting these Elves. 🤞for an Elven victory.