Well it's taken us a while to get sorted but we've finally got enough tanks and troops painted up to be able to fight Scenario 3 with fully painted forces. I took command of the Germans and my Eldest (9) took command of the Allies. We adapted the Scenario from the rule book so instead of having the Germans face Americans we had them face the British. This meant we had a Sherman firefly Captain and two Cromwells supported by two infantry sections and a Lt for the British. The Germans had the standard Panzer IV Lt, a Tiger tank two squads of Grenadiers and a Lt.
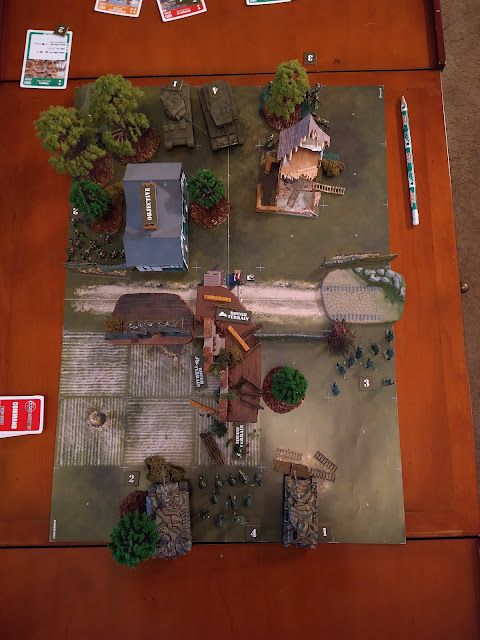 |
| Set up. Germans concentrate in the centre whilst the British spread out. |
Report
07 May 1945
To: Lt Col Jenkins CO 8th Bn Border Rgt
From: Capt Jenkins OIC A Sqd Border Yeomanry
Report:
We approached the Village from the North. Lt Tomkins with 3 section A Coy 8th Bn Border Regiment, took up position on the left flank behind a ruined barn. 2 section with Corporal Dodds took up an advanced position on the right flank ready to seize the farm house. I took up a central position with the Firefly supported on each side by two Cromwells from no1 Troop A Sqd. There was no sign of the German forces and so we Advanced on to the Objective.
2 Section under Cpl Dodds moved into the Farmhouse and secured the objective. Suddenly a Jerry Panzer IV rapidly advanced forwards into the main farmyard and fired on Sgt Baker's Cromwell on my left. This caused considerable damage leaving the Cromwell in a perilous state. Sgt Smith in his Cromwell decided to Open up on the Jerries and rushed forward around the back of the Farmhouse to take the Panzer IV in the Flank. Unfortunately he doesn't get a clean shot and only causes minimal Damage to the Panzer. His Machine Gunner also fired on the Grenadiers supporting a Tiger tank but only one of them was hit.
As Sgt Smith's Cromwell came round the back of the Farmhouse the turret on the Tiger tank traversed and fired. Sgt Smith's Cromwell exploded in a ball of fire and no survivors were found. I ordered my gunner to engage the Panzer IV to our front in the hope of taking it out but although it was a solid hit it wasn't enough to destroy it.
Suddenly a German artillery strike hit and shells fell all around Sgt Baker's Cromwell one scored a direct hit and demolished the tank.
 |
| The board at the end of turn 1. The Germans are on 8 points for destroying the Cromwells (2 points each plus a bonus 2 points each under the scenario victory conditions.) whilst the British are on 5 for holding the objective. It's looking good for the Whermacht. |
Before we could regroup the Panzer made a mechanised assault and fell back out of range of our gun. Moving in concert with the panzer the Grenadier squad on Jerries right flank advance up to the Farm walls along the edge of the road. They then opened fire of Cpl Dodd's 2 section in the objective. Luckily no one was hit as the thick walls of the farmhouse saved everyone inside.
Lt Tomkins and 3 Section doubled up to the farm walls along the road on our left flank directly opposite the German grenadier squad that had moved earlier.
Suddenly the Tiger, who were as cool as a frosty morning fired upon Cpl Dodd's 2 section in the Farmhouse. the damage was pretty impressive and blew a huge chunk out of the building killing 4 of the lads inside. This pinned Cpl Dodd's squad down in the farmhouse.
Luckily Cpl Dodd's never gives up and he managed to rally his squad into firing upon the Grenadiers sheltering behind the wall on the German right flank killing two of them and causing them to become pinned down. We then carried out a commando worthy assault to get into cover away from the Tigers gun.
(I forgot to take a picture at the end of turn 2!)
The Germans continued to hold the initiative with the Tiger displaying superb teamwork and pushing forwards into the Farm yard, As soon as it became obvious the Tiger was advancing we "moved it" out of there an went hull down behind the ruined barn. The Tiger fired on us but only caused minimal damage. Staying as Frosty as possible we returned fire and scored a direct hit on the Tiger causing considerable damage.
The German Grenadiers behind the farm wall on our left flank remained pinned and failed to move out from cover. Cpl Dodd's section used their PIAT to hit the Tiger tank and caused more damage to the formidable beast.
The Panzer IV fired upon Lt Tomkins and 3 section with HE and, despite their cover 5 lads were killed. Luckily Tomkins held his men together and they gritted their teeth.
 |
| The Board at then end of turn 3. The Panzer IV has fallen back out of range as it's down to just 2 hull points. The Tiger moved up to attack the Sherman Firefly but only caused 1 penetrating hit. in return the Firefly scored 3 penetrating hits! followed by 2 Section scoring a penetrating hit with their PIAT! scores are still Germans 8 British 5 |
With the Tiger out in the Open I seized the initiative and fired from our position behind the barn scoring a direct hit and blowing the turret off it. Despite this devastating loss the German Grenadiers with their LT at the back of their line showed superb teamwork and moved into a firing position to engage Cpl Dodd's 2 Section. The hail of rounds they put down left only Cpl Dodds in fighting condition but despite being pinned down he never gave up and continued to hold the objective.
Lt Tomkins and 3 Section fired on the Grenadiers in front of them and took down three more but the Germans remained pinned down. The Panzer IV the hired another HE round at Lt Tomkins and 3 Section but this time their cover saved them and no one was hit.
Displaying unbelievable fortitude and bravery above and beyond duty. Cpl Dodds took a pot shot at the German Lt and his squad but he failed to hit. The Grenadiers behind the farm wall finally plucked up the courage to pop their heads above the wall and took a few shots a Lt Tomkins and 3 Section but they failed to hit any of our boys.
At this point the Germans started to pull out leaving us in control of the Farm.
 |
| Board at the end of turn 4. The Tiger is gone all squads have passed morale to become unpinned but the British are quite firmly in control of the Farm with 2 Section still holding the Farm house (despite taking 90% casualties they only failed a handful of morale tests and never went below pinned!) The Panzer IV is dangerously low on armour points and the German no 3 Squad is only just above half strength. |
 |
| The German command station at the end of the battle. Two Cromwells destroyed but not enough! |
 |
| The British hand at the end of the Battle lots of dead Tommies but the Tiger tank won them the battle! |
This was a really fun Battle and proved that decisive action early in the game can win you the battle. The bold British move to send 3 Section in to capture the Farmhouse in the very first turn even though they weren't supported. Trusting to the British Tommies special "Never Give Up" rule which gives them a morale boost really worked in their favour allowing them to hold the objective for the entire game. On the flip side the Germans reluctance to get stuck in and backing the Panzer IV Lieutenant away from the combat zone was probably what cost them the battle.
Love these battle reports, and this is no exception to the rule. Well played that lad on taking the risky option!
ReplyDeleteThank you Joanna, he's finally learning to be bold but not rash. I'm going to have to up my game of the Wehrmacht are to have any chance of defending fortress Europe!
ReplyDelete