Sunday, 21 November 2021

Back to 1944 Again

So last time we looked at the British armour that we've been working on. Today it's the turn of the Panzers.

I've had an old Airfix Tiger kit sat in the gaming shed for pushing on 30 years. I'd lost the tracks years ago but Airfix sent me out a new set so I could complete the kit. and now I've managed to finish building it.

Finally completed after 30yrs of ownership, the tracks aren't quite right as an 11yr old me didn't do a great job of sticking the wheels on straight!

The kit has some faults with parts missing and it's not the most detailed but again the nostalgia kicked in with this and I'm pretty happy with the result so far. I've still got to add decals and I might look at scratch building some of the missing parts such as track guards and exhaust covers but it's fine for gaming with in its current condition.

To support the Tiger I also finished off my other Panzer IV. Again this is an old Airfix kit, at least as old as the Tiger and it was partly built I've just finished it and painted it up.

Here we have both completed Panzer IV's

I love this kit, I don't know why it's no better or worse than any other Airfix kit I've made but it has to be one of my all time favourites. It's probably linked to it being one of my favourite WW2 tanks but also it was one of the first I ever built back in the late 80's. The detail is good and the tanks just look great it's pretty easy to assemble and wouldn't take much work to make it into a fantastic model. As a wargaming piece it's top notch and I don't think I'd ever consider buying a different Panzer IV.

I've also been working on some Panzer Grenadiers to support these panzers and a few of sdkfz's of various types to transport the grenadiers. I was given the Revell version of the old Matchbox Panzer II and I'm looking forward to building that and comparing it to the one I built in the 80's.

Thursday, 18 November 2021

Back from the Ashes! and back to 1944

Well it's been quite a while since my last post on here. Life has once again gotten in the way of hobbying  and I haven't achieved an awful lot. What I have managed to achieve is mostly based around my WW2 1/72 scale projects for our Airfix battles wargame.

I've been working on my Wehrmacht armour and my eldest has been working on his British armoured units. First up is a Cromwell from Armour Fast,

The Armourfast Cromwell is on the left with our existing Airfix Cromwell on the right. Obviously there is a difference in scale as the Airfix Cromwell is 1/76 whereas Armourfast is 1/72.

It's not easy to see from these pictures but the Airfix Cromwell has much better detail than the Armourfast one. Considering the Airfix kit is getting on a bit my 8yr old managed to assemble and paint it with no problems.

We still have to paint on unit markings for the Armourfast Cromwell and these will be similar to the Airfix Decals. 

 The Armourfast tanks was very quick and easy to assemble and from a wargaming point of view it's got enough detail to satisfy the kids. Personally I prefer the Airfix kit as the detail is far higher and I really like the 1/76 scale I just think it looks better than 1/72 (probably because that's closer in scale to the model railway we're building in the attic.)

Next up was an Armourfast Sherman Firefly,

We painted the Sherman on the sprueas its easier to get to all of the parts. As you can see there are only a handful of parts to each tank on the Armourfast sprue.

A few minutes later and the Sherman is built, Not the best picture but it's a pretty basic tank. Again like the Cromwell above there's enough detail on here but nothing fantastic.

Next on the list for the British is an Arifix Sherman and it'll be interesting to see how the older 1/76 kit fares compared to this much newer 1/72. It's only fair to point out that you get two tanks in each Armourfast box compared to one in the Airfix boxes but the Airfix models are far more detailed and come with decals. The kids don't seem to mind which ones we use but I get a lot of nostalgia out of the Airfix kits I just wish I could find some of the old Matchbox 1/76 Sdkfz kits!


Wednesday, 28 April 2021

The Idol of Gork

 As you may have seen in my 2020 round up I managed to progress my Idol of Gork project a little toward the end of last year. I finished another 10 halberdiers and all of the hand gunners needed for the first scenario.

Here we have the almost complete unit of Von Bocks Halberdiers. There are 11 sat on the painting station to finish the unit off and I've got a plan for their flag. This unit is mostly made up from Battlemasters Halberdiers with a GW musician and Perry Bro's champion and standard.

Some of the extra hand gunners to create two units of 10 these are GW 6th Ed Empire Hand gunners.


The musicians and standard bearers for the two hand gunner regiments. These are Perry War of the Roses minis.

And here we have the leader of the Empire forces for the first scenario Von Bock. This is a Perry minis War of the Roses English Foot knight with a Perry Italian mercenaries metal head.


On the paining table at present are the remaining 11 Halberdiers, 10 Great swords, 20 crossbowmen and 20 halflings.  fingers crossed I'll have them finished by the end of May!

Tuesday, 9 February 2021

Back to 1944 again

Having spent so much time on The Idol of Gork scenario last year I decided to spend a bit of time on some of my Airfix models.

I've had some Airfix Panzer IV for years now and I gave them a pretty rubbish paint job back in the day so with the Boy and I spending a bit of time playing Airfix battles I decided to refurbish them.

I started off with a battered old Panzer II to test the paint scheme. I also had to carry out some repairs as this old veteran had lost its main gun and a number of it's wheels and one of it's tracks. (But it is a good 30 years old!)

This was an old Matchbox kit which is now available from Revell

 Once I was happy with the scheme I set to work on the Panzer IV's one is finished and is shown below. the other is nearing completion and both need new Decals. they're certainly far from perfect and they wouldn't win any awards  but they look half decent on the table top mowing down the Boys Tommies.

The scheme is a base of desert yellow washed with Nuln oil then dry brushed with desert yellow and bleached bone. The camouflage is bestial brown and Imperial Strike Green. All of the colours are either GW from the 80's and 90's (except nuln oil) or their equivalents from Coat'd Arms paints.

The black isn't quite as stark in real life but I'm thinking of toning it down with a dry brush of gunmetal grey from Humbrol. 


Monday, 1 February 2021

Back to 1944 making a scene!

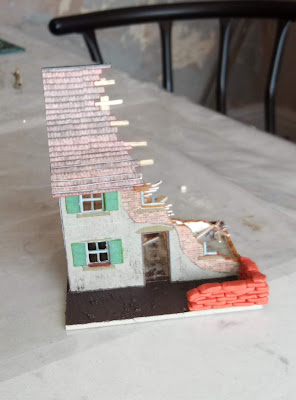
A while ago now I made a bombed out farm house so we could use it in the 'Rescue the Colonel' scenario. It was always my intention to put together a blog post on how I did it but I never got around to it. So as I've got a tiny bit of spare time on my hands I decided to post about it now.

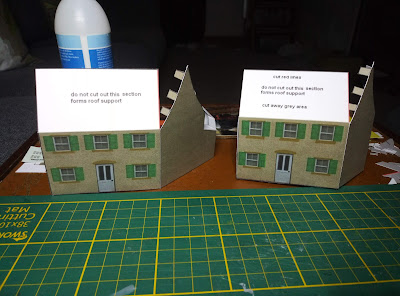
This is the downloaded and printed French farm house which can be found Here 

it's a nice easy kit and comes with instructions on how to assemble and how to print in 20mm and 15mm scales.

front and back are identical

the kit has a seperate roof and a small lean too for the front if you want.

The completed basic model

I built this to get a feel for how the house looked and so I could compare it size wise to my 20mm (1/72) figures and to the grid on the airfix battles mat.

Having made the basic house I was ready to create the ruined version. Here I've got a couple of copies of the house printed out, various pieces of mounting card which I got from Hobby Craft, some thin strips of Balsa wood approx 3mm x 3mm a metal ruler a sharp knife, the Airfix Battles mat and a selection of brick papers from Here

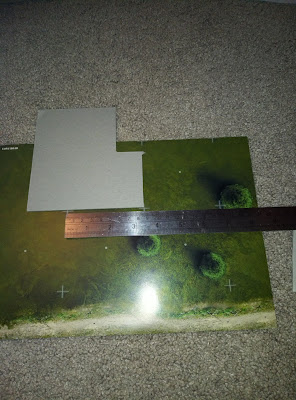
To create the base I measured the size of the grid and cut the mounting board to fit.

I then copied the outline for the farmhouse onto the mounting card and drew in the areas where I wanted damage. You'll notice that the gable has been cut with a rebate to accept the front and back walls

I kept test fitting the pieces throughout the process to make sure everything fitted together and looked right.

Once all of the pieces were cut out I made sure that they fitted together and looked ok.

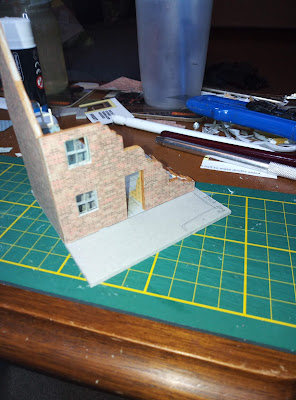
Next I covered the external walls in brick papermaking sure that the paper applied to the gable overhung slightly so it would cover up the ends of the front and back walls.

The inside of the Farmhouse received a flagstone floor courtesy of Wordsworth Model Railway


Here you can see how the overhang on the gable covers the ends of the front and back (the back isn't quite square on this photo)

Once the exterior had been covered in brick paper the interior was decorated with a selection of 1940's wallpapers from Here

The upstairs bathroom and kitchen were just whitewashed while the living room, hallway and master bedroom were papered. The attic wall was covered with brick paper.


Next I cut a piece of mounting board and papered it with the relevant wall paper to make the hallway.


Taking a spare copy of the original model I cut out the window frames using a scalpel and carefully fitted them into the window slots. because the mounting board is much thicker than the 200gsm card I printed the house on the frames fitted nicely inside the gaps and created a rebate.


Exposed edges were then painting in a brick colour which roughly matched the brick paper and the inside of the window frames were painted white. I've also added some more walls for the hallway to mark where the kitchen door was located.


Next I started to add some extra details some pictures on the walls and a rug on the living room floor courtesy of Wordsworth Model Railways household and white goods set.


Airfix German for scale.

I then used GW inks and washes to weather the house, concentrating on the tops of the walls to make it look as though water had been running down

Once the interior was complete it was back to the exterior and adding the render in the form of the original model. I think with hindsight the cut on the render is far too neat and smooth I should have made it more jagged as if the render had been blown off. I also cut out the shutters and window sills and lintels from the spare copy of the model and added them to the windows.

The back of the house

I think this render looks more realistic as the cuts are more jagged and angular. I lso put small pieces of mounting board under the render near the cuts to make it look as though the render was coming off the wall.

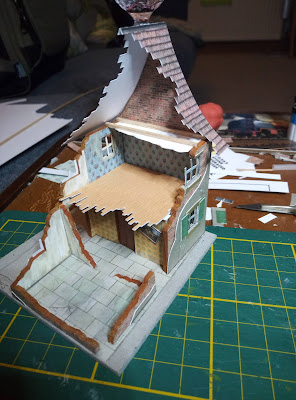
The ceiling was added onto the living room using white 200gsm card and then had balsa wood 'joists' added

The ceiling was then covered by a wooden floor with numerous planks cut out and the bedroom ceiling was added along with the roof joists.

testing the roof to see where it needed to be cut

The roof has been cut and fitted to the model.


The edges of the tiles were coloured in a similar reddish orange and the render was edged in grey which helped to disguise the smoother edges somewhat.


sandbags were added outside of the house to make it look as though it had been used as a guard house or command post. These were made out of modelling putty.

The floors inside were now weathered and rubble and debris added from the left over bits of wooden flooring and brick work papers.

The exterior was also weathered and the base was covered in sand and painted a dark brown.

Tiling the roof with individual strips of tiles to give greater relief on the roof


Sand bags have now been painted with a thin coat of desert yellow and flock has been added around the base as well as a dry brush of some lighter browns.


This HaT mortar commander was chosen to represent the Colonel in the scenario and he was based so that he would blend in with the upper storeys.


If I'm honest I haven't quite finished it as I haven't finished adding all the roof tile strips and the balsa wood rafters need a good stain and weathering as does the white inside of the roof and I forgot to paint the edges of the base but the boy's loved it and it worked well in the battle. It was also extremely cheap as I already had all of the items needed to build it left over from other projects so there was no extra expenditure :-)